
How to play
Your first trip can be short: hunt near the starting dock, bring back some Haul, then spend the Parts on an upgrade.
1. Choose a room and get moving
On the start screen, choose a callsign and select FFA, two teams, or four teams. The current server is US East; the displayed ping is a connection-latency estimate. Select Dive to join.
You begin in a Skiff with a basic torpedo weapon. On desktop, move with WASD or the arrow keys, aim with the cursor, and hold the mouse button to fire. Terrain blocks shots.
On a phone or tablet, rotate to landscape before joining. Portrait mode blocks your movement and firing controls, but the multiplayer world keeps running. Return to a safe dock before rotating or stepping away.
Controls at a glance
Phone and tablet
Rotate to landscape before joining. Keep the device in landscape during play; rotating does not pause the shared world.
- Left thumb
- Drag on the left half of the game to steer.
- Right thumb
- Drag on the right half to aim and fire. Lift your right thumb to stop firing.
- On-screen buttons
- Use Sonar, Refit, stat, and ability buttons for other actions.
Keyboard and mouse
- WASD
or arrows - Thrust up, left, down, and right. Release to stop thrusting; your sub still has momentum.
- Mouse + hold click
- Aim and fire. E toggles autofire; switch it off when you want to stop shooting.
- Shift / Q
- Activate Ballast Jets or Afterburner if fitted. The HUD shows the equipped ability and its cooldown.
- Space
- Send a sonar ping.
- 1–9
- Spend a point on the corresponding stat. You can also open the stat-points button in the HUD.
- Tab
- Open Refit. You can inspect your ship at sea; buying and fitting require a safe dock.
- T
- Open the quick-chat wheel.
- J / F
- Open Journal / interact with a nearby site. Use Settings for independent effects, ambience, and music volume.
2. XP, Haul, and Parts
Experience (XP) raises your level and grants stat points. Haul is cargo you carry. Parts are the money you spend in Refit, after banking Haul. Earning XP does not automatically put Parts in your wallet.
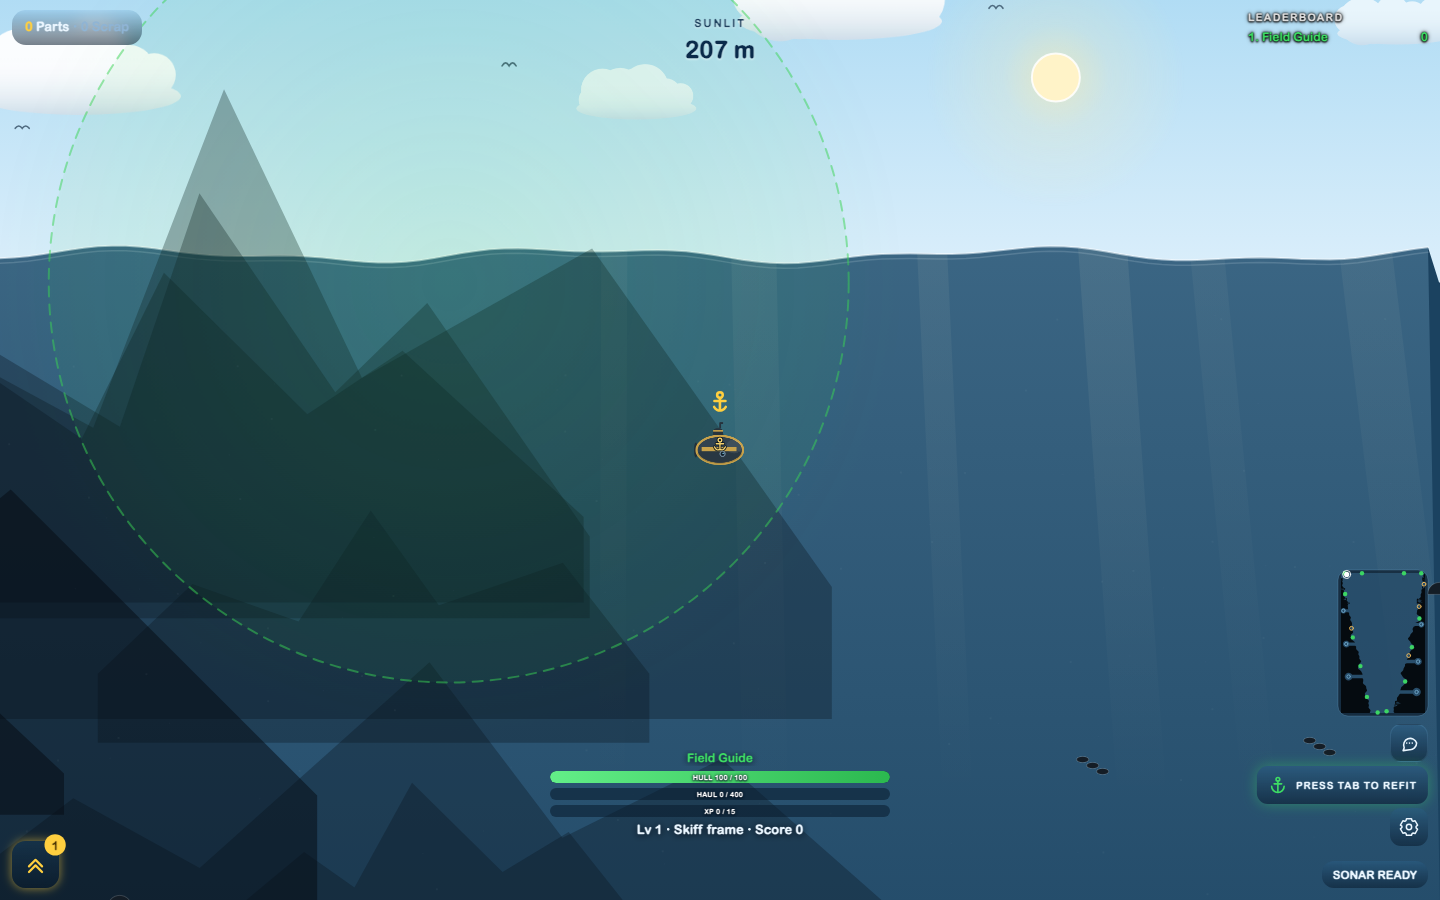
Keep an eye on three limits: your Hull, your Haul capacity, and your certified depth. A damaged sub needs a safer route home. A full hold cannot take more cargo. A deeper hull rating comes from pressure trials. The Journal tracker points toward your next station.
For an early target, identify the small Drift Jelly or Glassfin Shoal. Leave yourself space to back away rather than pressing your hull into a creature. Destroying fauna gives XP and adds Haul directly to your hold, up to its capacity. Wrecks left by sunk submarines are different: move over a wreck to salvage its cargo. Start your return before the hold is full if the path is unfamiliar.
3. Return to a dock and bank
Dock safety areas are large dashed circles; the HUD shows an anchor and a Refit prompt while you are docked. Remember the position of the dock near your starting area and use your minimap to return. Move inside the dome, release your controls, and wait for your carried Haul to count down. Banking happens automatically at a valid dock; there is no sell-cargo button.
The Bank complete message confirms the transfer, and your Parts total rises. Docks also repair your Hull. Wait for the cargo transfer to finish before departing, especially if you returned with a larger hold.
In team modes, use neutral docks or docks in your own team color. Enemy-team docks do not protect you.
Recent combat with another submarine can make you temporarily “hot.” The dome still blocks damage, but banking, repair, and refitting wait until that cooldown clears. If Refit is view-only, check the dock and combat status before trying to buy again.
4. Buy and fit a module
At a safe dock, press Tab or select Refit. Module tiers unlock at levels 5, 15, and 30. The shop lists prices and prerequisites.
Buying a module attempts to fit it automatically. If it stays in Inventory, check the bay limit and conflicts. Select fitted gear to return it to Inventory, then equip its replacement. Each hull has separate weapon and utility bays, plus one engine slot and one armor slot. Auto-Turret uses a weapon bay.
Tuned Screws improve movement; Keel Braces add Hull; Twin Tubes change the firing pattern. All three are available from level 5. Return Standard Tubes to Inventory before fitting Twin Tubes if your weapon bay is full.
Stats use points earned through levels; modules use Parts. Your hull caps each stat line. Compare a first loadout and its costs.
5. Choose a hull evolution
- At level 15, choose Cutter, Corvette, Bastion, or Surveyor from the cards above your callsign.
- At levels 30 and 45, choose one of your current hull’s two branches.
- Evolution is free and does not require a dock. The choice lasts for this life.
- If you pass a level gate without choosing, select each step in order.
- Death returns you to a Skiff. You can choose a new branch at your recovered level.
Hull percentage carries over when you evolve. Fitted gear stays equipped if it fits; overflow returns to Inventory. If nearby rock blocks a larger hull, move into open water and try again. Compare the full hull tree and bay limits.
6. Earn your next depth clearance
The depth meter shows your safe limit. You start cleared to 1,200 m. Each depth trial has a west station and an east station. Complete one station at each depth to earn its clearance. Follow the depth trial tracker to a pressure station, approach its beacon, then press F or select its on-screen button to activate the trial.
Activate the crossed-swords marker and fill your hold bar before the countdown ends. Time inside the ring fills the bar. Outside the ring, progress pauses but the countdown continues. Guardians warn before firing aimed bursts and circles of bullets. Their nearby pulses also push you outward. Keep moving, dodge through the gaps, and return if pushed out. Guardian kills are optional, and defeated guardians return after four seconds.
Other pilots can help, but each participant has a separate hold bar and countdown. During an active attempt, player damage and hull shoves are blocked in both directions, including brief knock-outs near the ring. Creatures and pressure can still hurt you. Moving more than 840 m from the marker cancels the attempt; death, completion, and timeout also end protection.
| Trial | Time in ring | Time limit | Guardians | Safe depth after completion |
|---|---|---|---|---|
| Sunlight Pressure Trial | 18 seconds | 35 seconds | 3 | 4,000 m |
| Twilight Pressure Trial | 24 seconds | 45 seconds | 4 | 10,000 m |
| Midnight Pressure Trial | 32 seconds | 60 seconds | 4 | Full trench |
Death resets your depth limit to 1,200 m. Repeat the pressure trials each life to go deeper. Levels and frames still unlock gear and stats, but do not grant depth access. Descending below your clearance causes pressure damage. Ascend when warned.
Named chambers connect through winding passages around rock islands. Explore their lost logs, signal puzzles, and hidden chambers. Open the Journal with J to read recovered logs, view depth trials, or check the shared operation. Signed-in players can pin a quest track or a one-off quest. Track goals use cumulative totals: after defeating three bosses, two more complete the five-boss stage. Each stage pays Scrap once at run end. One-off quests include discovering named places. Nearby interactions appear on screen; you do not need the guide to find your next trial.
Merchant ships float at the surface. Approach from below to buy repairs and survey pulses with Parts. They also buy carried Haul at 80% value. Docks retain the full banking rate. For cave guardians and world bosses, use the bestiary’s pattern guide.
What to aim for as you level up
You can stay in shallow water after unlocking the next depth. Get used to banking and repairing first, then try a longer trip.
Levels 1 to 4: bank your first load
Stay above 1,200 m and look for a Drift Jelly or Glassfin Shoal near a dock. Practice firing while backing away. When you have some Haul, return and watch it turn into Parts. Spend your stat points and let the dock repair your Hull before leaving again.
Levels 5 to 14: buy modules
Tier 1 modules unlock at level 5. Tuned Screws costs 120 Parts and uses the engine slot. Choose a weapon and support gear that fit the Skiff’s bay limits. Hull evolution costs no Parts, so you do not need to save for a frame.
Levels 15 to 29: choose your first branch
Choose Cutter, Corvette, Bastion, or Surveyor. Tier 2 modules also unlock at level 15. Some require an earlier purchase: own Harpoon Launcher before buying Railgun. The Cutter builds include complete shopping lists.
Pressure trials unlock deeper water independently of your level and hull. Complete the Sunlight Pressure Trial for 4,000 m clearance, then the Twilight Pressure Trial for 10,000 m. Bank before entering a cave guardian’s chamber and leave space to dodge.
Levels 30 to 44: specialize
Choose one of your hull’s two level-30 branches. The full tree has eight hulls at this stage, but only your branch’s children are available. Tier 3 modules unlock at level 30. Compare weapon bays, utility bays, speed, Hull, and cargo before evolving.
Complete the Midnight Pressure Trial for full-depth clearance. World bosses add attacks as they lose Hull. Bank a full hold and let your engine ability recharge before starting.
Level 45: choose your final hull
Choose one of your current hull’s two final branches. There are sixteen final hulls across the tree. Your modules remain customizable at safe docks. Check what fits before buying more gear.
When you sink, and what is saved
Death resets your Score, returns you in a Skiff, and lowers your level. A standard respawn returns 50% of your unspent Parts and fitted module value, plus 50% of carried Haul converted into Parts, with amounts rounded down. Armored Hold can recover more of the carried Haul. Unequipped Inventory items are not part of that refund. Hull choices reset, so you can evolve along a new branch after respawning. The death screen shows your run result and the level at which you will return.
Scrap is an account-only currency earned from XP, discoveries, completed quests, boss contributions, and depth milestones. Quests, achievements, Scrap, and cosmetics require sign-in and are saved across devices, alongside best Score, lifetime Score, best depth, submarine kills, and deaths. Best score and K/D appear on the signed-in menu. Open Account for kills and deaths. K/D counts enemy submarine kills against all deaths. Guests use the default appearance and can play all combat, depth trials, trading, and exploration. Callsign, guest best depth, display, and audio settings stay on this device.
Cosmetics
- Combine hull, trim, and pattern colors with materials, decals, trails, and sonar styles.
- Select Buy to own an item. Select Apply to equip the complete look.
- Save up to six named looks, including plans with locked pieces.
- Place two decals. Each has six positions, three sizes, and five rotation settings.
- Preview each hull family against shallow or deep water. Use 1:1 size to check the look at gameplay scale.
- Earn permanent Surveyor, Salvager, and Hunter rewards through exploration, salvage, and fauna encounters. Previous account progress counts.
- Open Achievements, then Cosmetics, to view collections or choose an Explore, Salvage, or Hunt assignment for extra Scrap. Assignments carry across dives and can be repeated.
- Check the run result for assignment progress and new pieces. Use Preview and Equip there, or open Last dive on the menu.
Cosmetics have no stat bonuses. Settings lets you disable their animated effects.
Recovered logs and puzzle progress survive death in the current session. Signed-in players keep these and quest progress between sessions; guests start fresh exploration progress with a new session. Your current level, ship loadout, banked Parts, and pressure clearance are not restored from an account save. The open page can reconnect after a brief interruption. Signed-in players can also reopen the game and select Dive within 15 seconds of disconnection to recover that run on the same server, in its original room. An account with an active connection blocks another tab. Returning to the main menu, an expired reconnect window, a room reset, or a server restart ends the live session. You can scuttle from the Journal and take the normal death penalty. Signed-in players receive any earned Scrap at run end; ending an empty run gives no reward. One account can have one active dive at a time. Sign in on the menu before diving. Old guest cosmetic and achievement saves are ignored and are not imported into an account.
If something gets in the way
Why can’t I buy or equip a module?
Check that you are at a neutral or allied dock and out of the combat cooldown. Then check your level, Parts, owned prerequisite, available slots, and conflicting items. Refit displays a reason beside unavailable purchases. A purchase can succeed while the item remains in Inventory because it cannot fit.
Why do I keep losing Hull without an obvious hit?
Look at the depth warning first. Ascend above your certified limit if it is active. Move away from creature contact and lingering hostile projectiles. Return to a dock to repair your Hull.
The game will not connect. What should I try?
Check the error below Dive and your connection. Use a current browser with JavaScript and WebSockets enabled. A restrictive work or school network may block the connection. If the problem persists, send the displayed error, browser/device, mode, and approximate time to support.
Can I pause, or play without a party?
The shared world does not pause when you open a menu or rotate your device. Return to a safe dock before stepping away. You can enter FFA or either team mode without a party.